Installing CENTOS 7
The assumption is you already have CENTOS 7 installed, connected to the internet and network location(s), and updated to current patch level. In addition, this document assumes MySQL is already installed and configured for the PROXY. If not, use the directions to install MySQL for Zabbix
This document will take the user from an initial CENTOS 7 setup to a full Zabbix installation. All steps should be included and anything missing should be added or relayed to the author for addition.
Installing Zabbix Prerequisites
- Install the Zabbix Repository
$rpm -ivh https://repo.zabbix.com/zabbix/4.0/rhel/7/x86_64/zabbix-release-4.0-1.el7.noarch.rpm
- Install Zabbix Packages
$yum-config-manager --enable rhel-7-server-optional-rpms
$yum -y install zabbix-proxy-mysql zabbix-agent zabbix-get
- Install PHP repository
$yum -y install http://rpms.remirepo.net/enterprise/remi-release-7.rpm
- Install PHP packages
$yum-config-manager --enable remi-php72
$yum -y update
$yum -y install php
Database installation
Make sure the database the proxy will be using is already installed. See my MySQL Install Guide for instructions on installing MySQL for Zabbix Proxies.
NOTE: This typically will be on the same servers, but can be separated if necessary. Either way, you need to ensure it exist first.
Configuring PHP for Zabbix
- Edit the PHP.ini file
$vim /etc/php.ini
May also need to change in: /etc/httpd/conf.d/zabbix.conf
Change the values to match the configuration shown:
max_execution_time = 600
max_input_time = 600
memory_limit = 256M
post_max_size = 32M
upload_max_filesize = 16M
date.timezone = UTC
expose_php = Off
- Edit the Zabbix Configuration file
$vim /etc/zabbix/zabbix_proxy.conf
- Edit the following lines with the appropriate entries:
Server=<Application Server IP Address>
ServerPort=10051
EnableRemoteCommands=1
LogRemoteCommands=1
DBHost=localhost
DBName=zabbix
DBUser=zabbix
DBPassword=<database password>
ProxyLocalBuffer=0
ProxyOfflineBuffer=72
HeartbeatFrequency=60
DataSenderFrequency=3
StartPollers=25
StartPollersUnreachable=5
StartTrappers=25
StartVMwareCollectors=3
- Open Firewall Ports
$firewall-cmd --permanent --add-port=10050/tcp
$firewall-cmd --permanent --add-port=10051/tcp
$firewall-cmd --reload
- Start the Zabbix Proxy
$systemctl start zabbix-proxy
$systemctl enable zabbix-proxy
- Verify the server is working
$systemctl status zabbix-proxy
- Setup Logrotate to prevent logs getting too large
Go to vim /etc/logrotate.d/mysql and verify the log location is correct, then uncomment as appropriate.
Add Proxy to Server
Zabbix Proxy servers are nothing more than another server being monitored by Zabbix until you tell the application that it IS a Proxy. To do that, you log into the application server then follow these steps:
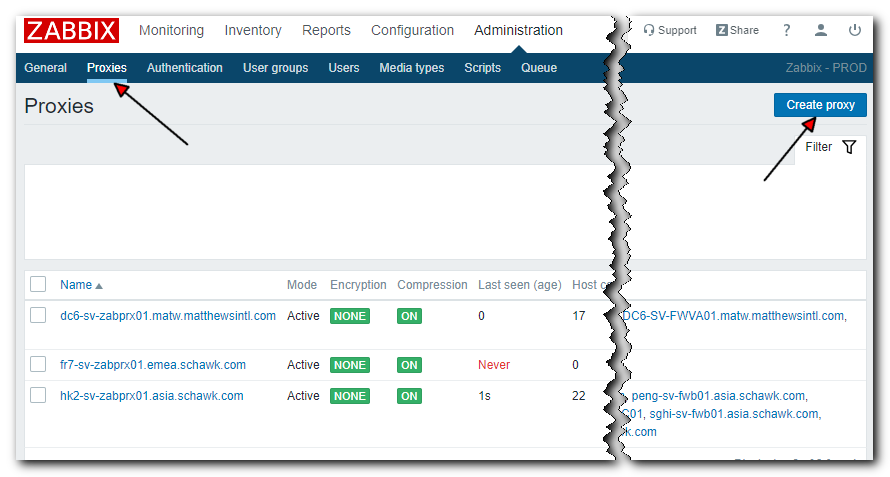
- Press
Create proxybutton on the Administration > Proxies screen

-
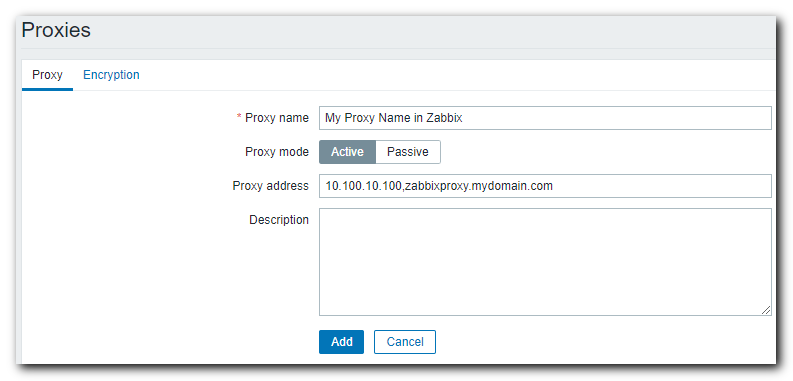
In the next screen, enter the proxy name you are expecting to see in the application on the Proxy name screen
-
Set your Proxy mode (I set mine to Active to allow for Active Monitoring)
-
Finally, set the Proxy address. This can be in IP Address format or DNS name format (or both separated by comma’s for each defined address)

- Lastly, if desired, set a description of this particular proxy server. This description does not show anywhere else I have found in Zabbix, but may be useful for keeping specific notes about this particular proxy.
Verify Proxy Setup
Once all this is done, the Proxy Server should be ready to provide proxy services to the Zabbix Application Server. To verify installation:
- Choose a server that is intended to be monitored and edit the Agent > Server section to point to the new proxy server (you can also change the Agent ActiveServer section, if appropriate, to point to this new Proxy Server to verify Active Proxy status).
- Restart the agent.
- Within a few minutes you should see the server being proxied by the new server. Alternatively, you should be able to view the server agent logs and/or the proxy server logs to see the connection or any connection errors that are occurring.
Known Issues and Resolution
The proxy and server are very similar. Issues found by the server apply to the proxy as well. One I ran into is
-
Verify SELinux isn’t causing the issue
- Update SELinux configurations
#if connection denied permission errors are seen, try changing to permissive $setenforce permissive #if that works, troubleshoot source or change to permissive permanently $vim /etc/sysconfig/selinux -
Verify the server name matches the Host Name in the Application server. The proxy will not be able to get ActiveServer rules if they are different. to resolve, use the nmtui tool to rename the server, or change the configuration in the Application Server to match the actual proxy server hostname.
-
The initial sizing of the hard drive was not sufficient for MySQL in use (even if it wasn’t storing significant data for Zabbix). To fix this, I had to extend the volume to add sufficient space for the proxy to work as normal. Instructions on how to do this can be found here
-
/var/lib/mysql/binlog.####### is filling disk. To resolve, removed older binlog files. May be worth creating a logrotate entry for it, but must find out the ramifications of that.
-
The Zabbix Agent should always point to the Zabbix Proxy it is monitoring. In this one case, set both SERVER= and SERVERACTIVE= to the localhost; aka 127.0.0.1 instead of the proxy you want it to be monitored from. This one change will increase proxy performance by an order of magnitude (I saw approximate performance numbers change from 60% utilization to about 3% proxy utilization by doing this one trick!)
Next Steps
- Configure Zabbix and/or add machines for monitoring as described in the Zabbix Administration Guide.
